Tag: script

Report of DNS settings on all Windows Servers via powershell

$AllServers=Get-ADComputer -Filter {OperatingSystem -Like "Windows Server*" -and Enabled -eq 'True'}
$Servers = ForEach ($Server in $AllServers){

$Result=Get-WmiObject -Class Win32_NetworkAdapterConfiguration -Filter "IPEnabled = 'True'" -Property DNSServerSearchOrder -ComputerName $Server.Name

New-Object -TypeName PSObject -Property @{
ComputerName = $Server.Name -join ','
DNSServerSearchOrder = $Result.DNSServerSearchOrder -join ','

} | Select-Object ComputerName,DNSServerSearchOrder | Export-Csv -Path C:\Temp\ServerDNSSettings.csv -NoTypeInformation -Append
}

Run this from a domain controller and it will report the DNS servers set on the NIC card.

Search group policies for specific setting

Sometimes you need to search in a domain environment for a specific setting in GPO’s. This script will search through all the GPO’s in the domain and list the results at the end!

# Get the string you want to search for
$string = Read-Host -Prompt "What string do you want to search for?"

# Set the domain to search for GPOs
$DomainName = $env:USERDNSDOMAIN

# Find all GPO's in the current domain of logged on user
write-host "Finding all the GPO's in $DomainName"
Import-Module grouppolicy
$allGposInDomain = Get-GPO -All -Domain $DomainName
[string[]] $MatchedGPOList = @()

# Look through each GPO's XML for the string
Write-Host "Starting search...."
foreach ($gpo in $allGposInDomain) {
    $report = Get-GPOReport -Guid $gpo.Id -ReportType Xml
    if ($report -match $string) {
        write-host "********** Match found in: $($gpo.DisplayName) **********" -foregroundcolor "Green"
        $MatchedGPOList += "$($gpo.DisplayName)";
    } # end if
    else {
        Write-Host "No match in: $($gpo.DisplayName)"
    } # end else
} # end foreach
write-host "`r`n"
write-host "Results: **************" -foregroundcolor "Yellow"
foreach ($match in $MatchedGPOList) {
    write-host "Match found in: $($match)" -foregroundcolor "Green"
}

Azure Resource Inventory Export

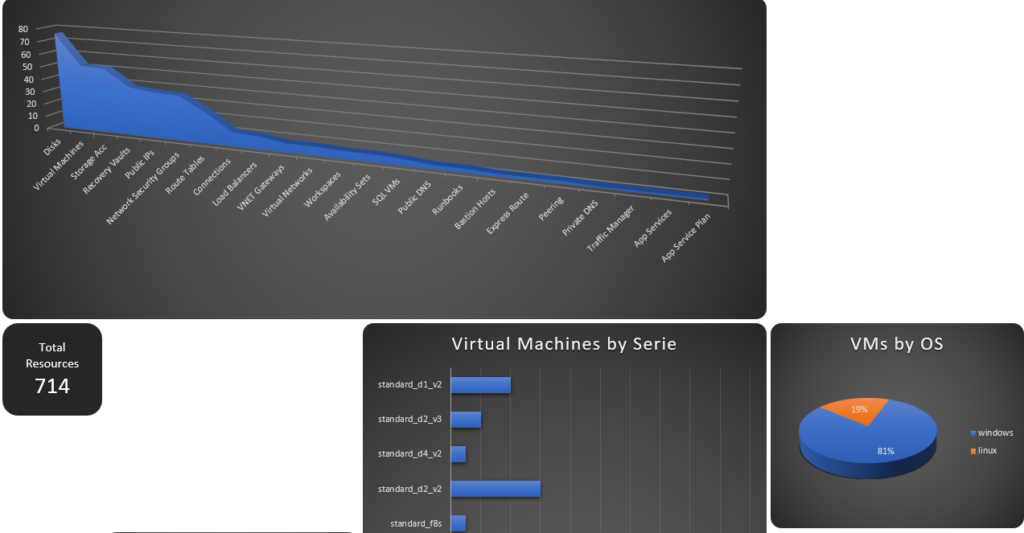
If you do not have any CMDB actively scanning you Azure environment, things could get messy if you’ve had several rushed deployments into your Azure infrastructure. I recently got to know about a script by a colleague, that can export every single resource in your subscription and display it in a very organized excel sheet.

Example

I’ve uploaded the file here in TXT format, download it and rename to .ps1 ; You might need to have the below modules installed on your PC and one extension –

Azure AD
Azure CLI

Once those are installed, add the resource graph extension with this command -|

az extension add --name resource-graph

Now run the script, it will take you to the login page of Microsoft, use an admin account with permissions to read the tenant.

Some users reported having to run the script with the trigger -Online as the excel was not being generated. I have also verified this bug occurs and using the -Online resolves it. A second bug is that it will show 0 resources in the excel. This is something on your PC and you must re-install the powershell modules and extension.

Credits for this script go to https://github.com/microsoft/ARI

Export all Azure Active Directory Users

Azure Active Directory has a ton of attributes which hold potentially useful information. I needed to compare what attributes are synced from an On-Premise AD environment to Azure AD. The client was using AD Sync Connector to synchronize their AD.

After collecting all the attributes from a Microsoft knowledgebase article, I added them all to the below script

# Export/working path, please create it before running script
$Path = Split-Path -Parent "C:\scripts\*.*"

# Create variable for the date stamp in log file
$LogDate = Get-Date -f yyyyMMddhhmm

# Define CSV and log file location variables
# They have to be on the same location as the script
$Csvfile = $Path + "\AllAzADUsers_$logDate.csv"

# Get all Azure AD users
$AzADUsers = Get-AzureADUser -All $true | Select-Object -Property *

# Display progress bar
$progressCount = 0
for ($i = 0; $i -le $AzADUsers.Count; $i++) {

    Write-Progress `
        -Id 0 `
        -Activity "Retrieving User " `
        -Status "$progressCount of $($AzADUsers.Count)" `
        -PercentComplete (($progressCount / $AzADUsers.Count) * 100)

    $progressCount++
}

# Create list
$AzADUsers | Sort-Object GivenName | Select-Object `
@{Label = "First name"; Expression = { $_.GivenName } },
@{Label = "Last name"; Expression = { $_.Surname } },
@{Label = "Display name"; Expression = { $_.DisplayName } },
@{Label = "User principal name"; Expression = { $_.UserPrincipalName } },
@{Label = "Street"; Expression = { $_.StreetAddress } },
@{Label = "City"; Expression = { $_.City } },
@{Label = "State/province"; Expression = { $_.State } },
@{Label = "Zip/Postal Code"; Expression = { $_.PostalCode } },
@{Label = "Country/region"; Expression = { $_.Country } },
@{Label = "Job Title"; Expression = { $_.JobTitle } },
@{Label = "Department"; Expression = { $_.Department } },
@{Label = "Company"; Expression = { $_.CompanyName } },
@{Label = "Description"; Expression = { $_.Description } },
@{Label = "Office"; Expression = { $_.PhysicalDeliveryOfficeName } },
@{Label = "Telephone number"; Expression = { $_.TelephoneNumber } },
@{Label = "E-mail"; Expression = { $_.Mail } },
@{Label = "Mobile"; Expression = { $_.Mobile } },
@{Label = "User type"; Expression = { $_.UserType } },
@{Label = "ageGroup"; Expression = { $_.ageGroup } },
@{Label = "alernativeSecurityId"; Expression = { $_.alernativeSecurityId } },
@{Label = "alernativeSecurityIds"; Expression = { $_.alernativeSecurityIds } },
@{Label = "consentProvidedForMinor"; Expression = { $_.consentProvidedForMinor } },
@{Label = "createdDateTime"; Expression = { $_.createdDateTime } },
@{Label = "creationType"; Expression = { $_.creationType } },
@{Label = "dateOfBirth"; Expression = { $_.dateOfBirth } },
@{Label = "facsimileTelephoneNumber"; Expression = { $_.facsimileTelephoneNumber } },
@{Label = "immutableId"; Expression = { $_.immutableId } },
@{Label = "legalAgeGroupClassification"; Expression = { $_.legalAgeGroupClassification } },
@{Label = "legalCountry"; Expression = { $_.legalCountry } },
@{Label = "mailNickName"; Expression = { $_.mailNickName } },
@{Label = "netId"; Expression = { $_.netId } },
@{Label = "objectId"; Expression = { $_.objectId } },
@{Label = "otherMails"; Expression = { $_.otherMails } },
@{Label = "password"; Expression = { $_.password } },
@{Label = "passwordPolicies"; Expression = { $_.passwordPolicies } },
@{Label = "physicalDeliveryOfficeName (officeLocation)"; Expression = { $_.physicalDeliveryOfficeName } },
@{Label = "preferredLanguage"; Expression = { $_.preferredLanguage } },
@{Label = "signInNames"; Expression = { $_.signInNames } },
@{Label = "signInNames.userName"; Expression = { $_.signInNames.userName } },
@{Label = "signInNames.phoneNumber"; Expression = { $_.signInNames.phoneNumber  } },
@{Label = "signInNames.emailAddress"; Expression = { $_.signInNames.emailAddress  } },
@{Label = "strongAuthenticationAlternativePhoneNumber"; Expression = { $_.strongAuthenticationAlternativePhoneNumber } },
@{Label = "strongAuthenticationEmailAddress"; Expression = { $_.strongAuthenticationEmailAddress } },
@{Label = "strongAuthenticationPhoneNumber"; Expression = { $_.strongAuthenticationPhoneNumber } },
@{Label = "usageLocation"; Expression = { $_.usageLocation } },
@{Label = "userType"; Expression = { $_.userType } },
@{Label = "userState"; Expression = { $_.userState } },
@{Label = "userStateChangedOn"; Expression = { $_.userStateChangedOn } },
@{Label = "Dirsync"; Expression = { if (($_.DirSyncEnabled -eq 'True') ) { 'True' } Else { 'False' } } },
@{Label = "Account status"; Expression = { if (($_.AccountEnabled -eq 'True') ) { 'Enabled' } Else { 'Disabled' } } } |


# Export report to CSV file
Export-Csv -Encoding UTF8 -Path $Csvfile -NoTypeInformation #-Delimiter ";"
SFTP Automatic using winSCP


This script is partially generated from WinSCP automation, however has been modified to put two files onto the remote server with a timestamp and remove any files which are over 14 Days old in that specific remote directory.

Please note that the SSH-RSA key has to be changed to match your host being accessed by winscp.

@echo off
“C:\Program Files (x86)\WinSCP\WinSCP.com” ^
/command ^
“open sftp://YOURUSERNAME:[email protected]/ -hostkey=””ssh-rsa 2048 X7f9U4Io2IKF8G/m/OenvXvkDGuMGm0PI5b0/BGOpRM=”” -rawsettings FSProtocol=2″ ^
“lcd “”E:\YOURFOLDER””” ^
“cd /REMOTEFOLDER” ^
“put “”FILE1.csv”” “”FILE1%%TIMESTAMP#yyyymmdd%%.csv”” ” ^
“put “”FILE2.csv”” “”FILE2%%TIMESTAMP#yyyymmdd%%.csv”” ” ^
“rm *<14D ” ^
“exit”


set WINSCP_RESULT=%ERRORLEVEL%
if %WINSCP_RESULT% equ 0 (
echo Success
) else (
echo Error
)

exit /b %WINSCP_RESULT%

Replace Ubuntu Logo

This might come in handy if you need to change the splash loading screen of the Ubuntu logo. However you will still have the purple loading dots just as an activity monitor.

Some important things to note about the script – 

If a file “branded.txt” exists in the “kiosk” user Document folder, it will stop the script from executing.

Once the system is “branded”, it will output the brand selection to the file “branded.txt” as can be seen in the script below.

Your custom logos need to be placed in a directory called “logos” in “/opt”

You need to have two copies of the same logo, but named differently in the directory /opt/logos and this should also reflect in the script.

The script relies on Zenity to be installed so that it can call a dialog box where it will ask for the logo number to be inputted.

If you have more than 4 logo’s which could be chosen, you can just extend the script and increase the input string number from “4” to your chosen amount.

!/bin/bash
inputStr=100
while [ $inputStr -gt 4 ]
do
if [ -e /home/kiosk/Documents/branded.txt ];
then
exit
else
inputStr=$(zenity --entry --title="Input Office Number" --text="Office Number:")
fi
case $inputStr in
1) mv /opt/logos/logo1.png /usr/share/plymouth/themes/ubuntu-logo/ubuntu-logo.png & /opt/logos/logo11.png /usr/share/plymouth/themes/ubuntu-logo/ubuntu-logo16.png
echo 'branded1' >/home/kiosk/Documents/branded.txt
;;
2) mv /opt/logos/logo2.png /usr/share/plymouth/themes/ubuntu-logo/ubuntu-logo.png & /opt/logos/logo22.png /usr/share/plymouth/themes/ubuntu-logo/ubuntu-logo16.png
echo 'branded2' >/home/kiosk/Documents/branded.txt
;;
3) mv /opt/logos/logo3.png /usr/share/plymouth/themes/ubuntu-logo/ubuntu-logo.png & /opt/logos/logo33.png /usr/share/plymouth/themes/ubuntu-logo/ubuntu-logo16.png
echo 'branded3' >/home/kiosk/Documents/branded.txt
;;
4) mv /opt/logos/logo4.png /usr/share/plymouth/themes/ubuntu-logo/ubuntu-logo.png & /opt/logos/logo44.png /usr/share/plymouth/themes/ubuntu-logo/ubuntu-logo16.png
echo 'branded4' >/home/kiosk/Documents/branded.txt
;;
esac
done

In addition to this script you will also need to edit the folder where the logos are placed by default for the system and also create the directory where you are storing your custom logos. You can do so by running the below commands

chmod +777 /usr/share/plymouth/themes/ubuntu-logo
mkdir /opt/logos
chmod +777 /opt/logos

Bash script loops

I’ve recently had to do some a project where I needed to launch a specific application on login of user account in an Ubuntu environment and where if it was closed, it would re-open again countless times. This is accomplished with the below – 

sudo install -b -m 755 /dev/stdin /opt/autolaunch.sh << EOF
!/bin/bash
xset -dpms
xset s off

while true; do
***APPLICATION COMMAND GOES HERE***
done
EOF

The above installs the script to launch at startup from the location /opt/autolaunch.sh. The first two commands are disabling power saving and the screensaver. The last part is the while loop.